Set up Windows Mobile Phone
Step 1: Edit Server Settings
Enter Server Address
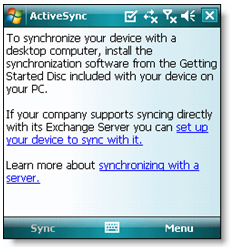
- Go to Start
- Select All Programs
- Select Active Sync
- If this is the first time you are setting up your device, click Set up your device to sync with it.
If you previously have set up your device, and do not see the window below, click on Menu in the bottom right and then click Configure Server.
- In the Edit Server Settings window, enter m.google.com as the server address.
- Ensure that This server requires an encrypted (SSL) connection is selected.
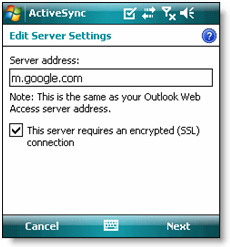
- Click Next.
Sign In to Your Google Account
- Enter your full CSU East Bay email address as the User name. (first.last@csueastbay.edu)
- Enter your NetID password as the Password.
- Leave the Domain field empty. If your device requires you to enter a domain name, enter google.
- Check Save password.
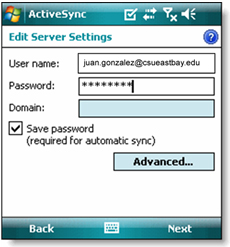
- Click Next.
- Check Contacts, Calendar, or Email, depending on which you'd like to sync. (Tasks are not supported and will lead to an error if checked.)
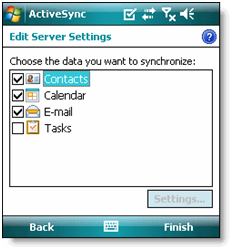
- Click Finish.
- If your device does not automatically start syncing, click Sync.
Adding the Sent Folder to Sync
Select Sent Items in Outlook.
- Get into your Outlook email
- Select ‘ Menu’ in the bottom right hand corner.
- Select 'Tools' then Select 'Manage Folders'
- Check the 'Sent Items ' box.
- Hit 'OK' in the top right hand corner.
Additional Options
You can limit the history of emails that get downloaded to your mobile device.
- Go to Start
- Select All Programs
- Select Active Sync
- Click on Email so that it is highlighted.
- The Settings button will become active. Click on Settings.
- In the E-mail Sync Options window, after “Download the past:” use the drop-down box to determine the number of days you want download.
- Hit 'OK' in the top right hand corner to close the Email Sync Options window.
- Hit 'OK' in the top right hand corner to close the Settings window.
- Hit 'OK' in the top right hand corner to close ActiveSync.